Watercraft Maintenance Tips
Feb 15th 2018
Watercraft Maintenance Tips

February is halfway over and there’s still a bit of time left before Winter goes away for another year, but if you’re planning to take to the open water as soon as the warm weather hits, now would be a good time to start prepping your boat or personal watercraft for preseason maintenance.

Like many sports car owners who store their rides away for Winter hibernation, water-fairing enthusiasts often do the same for their watercraft. For owners of smaller personal watercraft such as Jet Skis and WaveRunners, this might also involve physically removing the vehicle from the water and into a sheltered location. Boat owners have the option of trailering their boats or docking them at a nearby lagoon where it’s less likely to be subjected to seasonal weather wear.

However one might choose to temporarily retire his/her watercraft, it still involves a bit of preparation and maintenance to ensure that everything is in top working order once the resting period subsides. Keep in mind that the major difference between cars and boats (and it’s an obvious one, at that) is that cars are for land and boats are for water. Metal corrosion from water and salt spray is the biggest enemy here and it’s often responsible for the majority of watercraft performance issues. Let’s discuss 5 crucial target areas for marine and personal watercraft maintenance.
#1: ENGINE
- If you haven’t already done so prior to Winter storage, replace all engine fluids and filters. Don’t reuse the filters unless they have been designed to be used as such (IE: K&N washable/reusable filters).
- Inspect the spark plugs for carbon build-up and/or damage. If the plugs are simply dirty, clean them. If broken or worn out from age, replace as per the manufacturer’s suggested maintenance schedule. Plugs that are completely fouled are indicative of a more serious issue within the engine.
- Inspect all grease fittings and add grease/replace if necessary.
- Remove the propellers and check the lower-unit seal. For boats that are used in ocean water, clean off any organic material that has become attached to the propeller.
- Grease the propeller shaft. Use a new cotter pin when reinstalling.
- Remove the lower unit and inspect the water pump. Replace if necessary.
- Inspect the engine zinc anodes and replace accordingly.
- The outboard bracket grounding cable is susceptible to corrosion and breakage. Inspect, then clean or replace as needed.
- Inspect the power trim tilt rams and end caps. Service them if needed and coat with waterproof grease.
- Replace all external spin-on type fuel filter canisters.
- Carefully inspect all fuel hoses and primer bulbs for leaks, wear, cracking, or weathering. This is particularly important with older boats because ethanol fuel can deteriorate hoses that are not rated for ethanol fuel use.
- Inspect all fuel system connections, couplings, and fittings for any signs of leakage.
- Check the fuel vent and fill tube to the fuel tank to make sure vapor and fuel can flow freely. If you notice the smell of gasoline during examination, try to trace the source of the leakage. DO NOT USE if you have any unresolved problems with the engine and fuel system.
#2: ELECTRICAL
- Inspect the battery, battery cables, and terminals. Clean off any corrosion from the terminals with a wire brush and a baking soda and water solution. Dry and coat with dielectric grease. Don’t use white lithium grease as it can promote corrosion from high voltage.
- Check the battery cables for internal corrosion by gently bending sections of the cables. If these feel unusually stiff and brittle and you can feel/hear cracking inside when you bend them, the wire cores are corroded and the cables need to be replaced.
- Load-test all batteries. Replace any bad batteries if you cannot recharge them (outside of the vehicle).
- Check the battery switches to ensure that they are still functional.
- Inspect breakers, fuse panels, and bus bars for corrosion. Replace any components that show evidence of corrosion damage.
- Check all helm switches.
- Check all lights. If you’re planning to convert to low-amperage LED lighting, now would be a good time to do so, especially if a light has burned out and stopped functioning.
- Check all of the electronic accessories and make sure that they are all working properly. Pay close attention to the electrical connections which are extremely vulnerable to corrosion.
#3: STEERING (BOATS)
- Hydraulic NON-power-assisted marine steering systems have a small fill cap. Often, it is accessible on the pump body itself but can sometimes be routed to a port on top of the console. For hydraulic power-assisted systems, the fill is at the pump reservoir. Whichever system your boat uses, check the fluid level and top off as required.
- Inspect all hoses, connections, clamps, and fittings for leaks. Tighten or replace any components that are broken or leaking.
- Inspect the hydraulic steering cylinder and end caps and replace the seals if they are leaking or if the caps show excessive amounts of corrosion. Remember to bleed the system afterward.
- Grease the fittings on the steering tilt tube, as well as the steering-arm assemblies on cable-steering systems.
#4: HULL
- Inspect all through-hull fittings from the inside and outside to be sure they are secure, undamaged and free of leaks. Tighten, replace and reseal as needed.
- Exercise all through-hull valves to be sure they are working. Replace any frozen valves.
- Inspect all hoses from through-hull fittings. Replace any leaky hoses and/or corroded, rusted out hose clamps. If there is spare room left on a hose barb, double-clamp the fitting.
- Check all bilge pumps and automatic switches. Replace any non-functioning components before you go boating.
- Check all other pumps, including fish-box, livewell and washdown pumps. Replace any leaking or non-functioning pumps.
- Inspect your anchor rode and replace any components that show excessive wear.
- Inspect the frame for cracks and pay close attention to the areas around the welds. HAVE THESE REPAIRED NOW before the cracks have a chance to further expand and break.
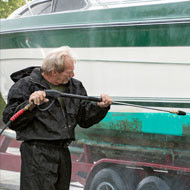
- For boats that are stored in a wet slip when not in service, natural waterborne flora and fauna can attach themselves onto the underside of the boat. When the boat is out of the water, either by dry docking or trailering, clear away the organic material with either a chemical solvent or by manually picking it off the surface. Barnacles will be the most difficult and stubborn to remove. You can try using chemical barnacle remover to dissolve them or to manually remove them, use a plastic putty knife. If you must use a metal knife, take extra care as to not gouge or carve into the hull. NEVER use a reciprocating saw or any power tools to remove barnacles!
#5: TRIM TABS
- Inspect the trim tabs, screws, bolts and rams for wear and corrosion. If you have hydraulic trim tabs, check the cylinders for leaks. If you discover one that is leaking, you should replace both of them since the other is most likely going to start leaking very soon.
- Inspect hydraulic lines, pump, and reservoir connections to ensure that they are free of leaks. Tighten or replace any leaky components. Top off with the recommended fluid as needed.
Discount Starter & Alternator has a massive online inventory of marine and watercraft parts, watercraft parts and accessories, and brand new, aftermarket replacement parts that meet or exceed OEM specifications.