ATV Carburetor Maintenance
Jun 27th 2019
ATV CARBURETOR MAINTENANCE

Carburetors are still quite commonplace in motorcycles and ATVs, such as this Yamaha Moto 4.
Unlike modern passenger vehicles you see on the road today, there are still quite a few late model motorcycles, ATVs, snowmobiles, powerboats, and other recreational powersports vehicles that use carburetors as opposed to fuel injection systems. That's because they don't face the same restrictions as cars and trucks do in regards to emissions and fuel economy. Carburetors are also less expensive to produce, which is why many manufacturers continue to equip them in their new models. The advantages are also passed down to you, the buyer. Because unlike a complicated electronic fuel injection system, carburetor maintenance is easy enough for anyone to perform with the most basic mechanical skills. Our quick how-to instructional piece will show you how to clean and maintain the carburetor on your motorcycle or ATV for maximum performance and efficiency.
WHY DO I NEED TO CLEAN THE CARBURETOR?
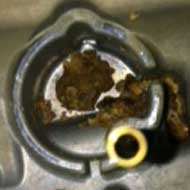
Carbon buildup on a neglected carburetor.

All that nasty black soot that you see caked around the exhaust pipe exits, that’s all carbon deposits. Carbon is a byproduct of combustion and all gasoline-burning engines produce it. Engines that experience regular daily use are less-prone to carbon buildup as proper heat cycles and fuel flow help to clean and break up carbon deposits before they can accumulate. When engines sit unused for long extended periods of time, carbon deposits can harden and varnish can form in the carburetor, intake, and combustion chambers. Also, in many parts of the country, gasoline is mixed with ethanol and a nasty side-effect of ethanol is that draws moisture directly from the atmosphere. We all know that water and gasoline is a problem. This excess moisture can also promote rust on sensitive carburetor parts such as in the float, the jets, along the throttle plate, and also on the exterior linkages and connections. That’s why it’s a good idea to use a water displacer or fuel stabilizer if storing your powersports vehicle for a season or for any extended timeframe. The tell-tale signs that your carburetor may be due for a good deep-cleaning include rough and choppy idle, poor throttle response, difficulty starting, and the possibility of random stalling. At first, these symptoms can seem quite scary but more often than not, the solution is a simple but thorough cleaning of the carburetor. Especially, if you haven’t started your engine in over a month.
So, now that you know the reasons why you should keep your carburetor clean, let’s go over the steps on how to do it.
YOU WILL NEED:
- Screwdrivers (Phillips and flathead screwdrivers)
- Needle nose pliers
- Wire brush (A toothbrush also works. It can be an old one or a brand new one, just as long as it’s not the one you’re using now.)
- Rags (Avoid using paper towels. Fine paper fibers can clog sensitive carburetor parts, thus negating the whole purpose of cleaning the carburetor in the first place.)
- Nitrile gloves
- Air compressor (A can of computer duster can be a suitable substitute.)
- Protective eyewear
- Wrench or socket set
- Carburetor and choke cleaner
- Throttle cleaner (There IS a difference. Only use this for the throttle plate.)
- New gaskets (HIGHLY RECOMMENDED!)
- Carburetor rebuild kit (Might be necessary, especially on older models or vehicles that have been sat unused for a very, very long time.)
#1: REMOVE THE CARBURETOR
Turn off the fuel valve on your fuel tank and then track the fuel line down to the carburetor. Remove the hose. This would be a good time to inspect the condition of the fuel hose and check for any cracks or dry rot (replace if necessary, do not reuse damaged fuel line). Remove the overflow hose that runs out of the carburetor and then loosen the clamps at the front and rear of the carburetor. The carburetor will now be loose, but held in place by the throttle cable. Don’t let it hang under its own weight as this can cause premature wear and stretching of the throttle cable. Twist the top cap to remove the throttle cable and remove the carburetor. Once the carburetor has been unmounted, remove the throttle slide from the cable.
#2: REMOVE THE FLOAT
When cleaning a carburetor, this is the first thing to be taken apart. Common problems include engine flooding, running too rich (too much fuel) or too lean (too much air), and stalling under engine load. Remove the float bowl by loosening the four screws on the bottom of the carburetor. Be mindful not to use excessive force as these screws can strip easily. Gently pull the float bowl off the carburetor.TIP: You might want to replace the gasket.
With your needle nose pliers, gently pull out the float pin. Once the pin has been removed, the float itself can be removed. Note that on some carburetors, the needle will be hanging on the float and come out with it.
#3: REMOVE THE JETS
WARNING: Some carburetors have splash jets that need to be removed before the jets themselves can be extracted.
The jets are where the fuel flows and mixes with the atmospheric air. These are screws with a small hole through them, much like a brake bleed screw. The main jet is short and fat and will have either a hex head or a flat screw head. The pilot jet is long and thin and have a flat screw head. Be careful not to use too much force when removing the jets; the biggest risk is accidentally stripping the screw threads and getting tiny metal shavings inside the hard-to-reach spots and crevices within the carburetor interior.
#4: REMOVE THE EXTERIOR PARTS
This is the idle screw, air screw, and the choke (if external). With a flathead screwdriver, remove the idle and air screws. Again, be mindful not to use heavy force. If the carburetor has an external choke, turn the top with a wrench. The choke should easily slide out.
#5: CLEAN!
WARNING: Remove all gaskets and o-rings prior to cleaning the carburetor. Carburetor cleaner chemicals will eat through rubber o-rings. Also, be sure to wear nitrile gloves and safety glasses when using the spray cleaners. It’s nasty stuff and you don’t want it soaking into your skin and/or getting in your eyes.
Spray a little bit of carburetor cleaner on the exterior and use your wire brush/tooth brush to break up and agitate the debris. Give it another good shot of the spray cleaner and begin to work the holes where the jets, air and idle screws, float needle, and choke reside. Spray the holes directly with the cleaner. For stuck, caked-on debris, try to blow it out with compressed air (a thin needle or steel guitar string can also help fish out the gunk). For the throttle inlet, spray the throttle cleaner while breaking up the deposits with your brush. Spray again to wash away the residue. When finished, blow off the carburetor with compressed air. Don’t let the loosened dirt/carbon debris/cleaner sludge dry back onto the carburetor and its components.
#6: REASSEMBLE THE CARBURETOR AND REINSTALL THE UNIT

Discount Starter & Alternator sells complete carburetor rebuild kits.
This would be a perfect opportunity to replace your old gaskets and o-rings with brand new ones. These pieces are meant to form tight impenetrable seals and by dislodging and disassembling the carburetor, you risk damaging these protective layers. At Discount Starter & Alternator, we specialize in recreational power sports machines like ATVs, UTVs, motorcycles, and more. We carry full carb kits for Yamaha, Kawasaki, Honda, Polaris and other major powersports brands.